Overview
ComputerEase Field is a software available from anywhere by accessing it either in a browser or mobile application. ComputerEase Field allows users working in the field to create entries that flow to the office for processing and ComputerEase updates Field users on items status. Access to capabilities in ComputerEase Field are controlled by permissions set in ComputerEase.
This product is designed for use on iOS or Android mobile devices such as phones or tablets and on supported browsers.
This document provides instructions for the configuration and use of ComputerEase Field.
Note: The scope of this administrator guide is currently restricted to limited availability. The final content can change prior to the official release. Please use this guide for guidance only.
Features Not Yet Supported in the App
The following features are on the roadmap for future release but not yet available in the current app.
- Service management
- Fleet and asset service orders
- Splitting expenses across cost areas
- Location tracking outside of a time entry record
- Offline entries
Prerequisites
You need the following before you can use ComputerEase Field:
- License for ComputerEase Field Time, Expense, or Project Management capabilities.
- ComputerEase 25.2 or higher.
- Active CE Live installation (refer to this link for instructions).
- Active connection to the internet.
- ComputerEase Desktop user permissions to enable field configurations.
Mobile Device Requirements
The ComputerEase Field application supports mobile devices (phones or tablets) that run on the following operating systems:
- iOS Apple mobile devices (phone or tablet) version 12 or higher
- Android mobile devices (phone or tablet) version 11 or higher
Browser Requirements
To ensure access to all supported features in the browser interface of ComputerEase Field, it is recommended you always use the latest versions of the supported browsers.
The following browsers are supported by ComputerEase Field:
- Chrome
- Firefox
- Microsoft Edge
- Safari
Activating ComputerEase Field Users
CE Live needs to be running to establish a connection to the API between ComputerEase and ComputerEase Field (refer to this link for instructions).
The following items need to be configured to begin using ComputerEase Field.
Company Information
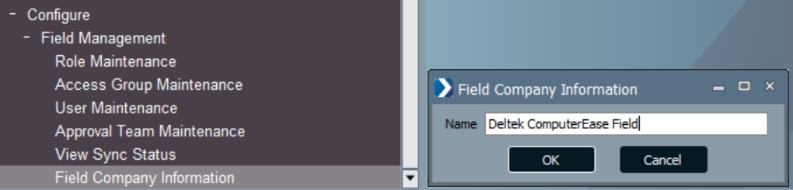
To view company information, click Configure > Field Management > Field Company Information.
The Name displayed here is the company name the Field user will see when selecting the company to perform entries. This is a required step.
Role Maintenance
Roles define what capabilities a Field user can utilize (Time, Expense, or Project Management) and their permissions within those areas. At least one Role is required.
Examples of Roles might be:
- Field Employee
- Foreman
- Project Manager
To create Roles and configure settings for these Roles, click Configure > Field Management > Role Maintenance.
When you create a Role, the number of available "seats" on your license will be displayed for Time, Expense, and Project Management. If enabling a capability results in exceeding your available seats, you will be unable to save your changes.
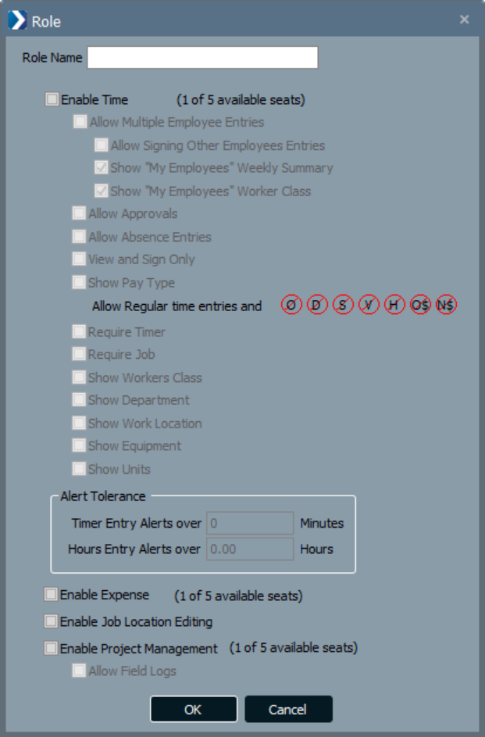
After you create a Role, you need to configure the following permissions. Selecting an option enables the function for the Field User; clearing it disallows.
- Enable Time: Users ability to access the Time capability.
- Allow Multiple Employee Entries: Users ability to enter time for themselves and other employees. The following options will be available if "Allow Multiple Employees Entries" is selected:
- Allow Signing Other Employees Entries: Select this option to allow a foreman, crew leader, or project manager to sign for other employees if those employees do not have access to sign for themselves.
- Show "My Employees" Weekly Summary: Select this option to include employee time that was entered by another user on jobs that are not theirs on the Employees' Weekly Summary display.
- Show "My Employees" Worker Class: Select this option to display employees' worker class to other employees.
- Allow Approvals: Select this option to allow the user to approve time entries through ComputerEase Field.
- Allow Absence Entries: Select this option to allow the user to enter absences through ComputerEase Field.
- View and Sign Only: If you select this checkbox, the user can view and sign time entries, but cannot add or edit time entries.
- Show Pay Type: The default is Regular time; however, you can allow or disallow entry of Overtime (O), Doubletime (D), Sick (S), Vacation (V), Holiday (H), Other (O$), and Non-taxable (N$).
- Require Timer: Require employees to provide a start and stop time to create entries.
- Require Job: Require a job number for all entries.
- Show Workers Class: Displays the Workers Class and allows it to be changed by the Field user.
- Show Department: Displays the Payroll Department and allows it to be changed by the Field user.
- Show Work Location: Displays the Work Location (Job, Shop, Travel) and allows it to be changed by the Field user.
- Show Equipment: Allows Equipment usage and hours to be entered. Note: Equipment Operator settings found in Employee Maintenance could affect this capability.
- Show Units: Allows Units to be entered by the user.
- Allow Multiple Employee Entries: Users ability to enter time for themselves and other employees. The following options will be available if "Allow Multiple Employees Entries" is selected:
- Alert Tolerance: The settings on the Alert Tolerance section control when a Field Alert displays for time and geofence discrepancies and are configured in minutes and hours. Based on the tolerance value, an alert is received by the ComputerEase Field user based on the difference of time entries recorded by ComputerEase Fields geofence activity and the time entries submitted by a user.
- Enable Expense: Allows Field users to access the Expense capability.
- Enable Job Location Editing: Allows users to establish geolocation and perform geofence revisions.
- Enable Project Management: Enables the Field user to access Project Management features.
- Allow Field Logs: Allows users to create and view Field Logs.
Understanding Job Locations
When you initially create a geolocation for a Job and there is an address within ComputerEase (Create/Edit a Job), ComputerEase Field will attempt to pin that location as the jobsite. If the ComputerEase Field user is allowed, (Enable Job Location Editing), the Field user can adjust the pin as necessary, so employees are notified when entering the geofence area (refer to Role Maintenance > Enable Job Location Editing for instructions). All geolocations are initialized and configured in ComputerEase Field. An address is not required in ComputerEase in Job Costing System > Job Maintenance > Create/Edit a Job to utilize geolocations.
Access Group Maintenance
Access Groups define which data sets ComputerEase Field users can access. One or more Access Groups can be assigned to a User.
To create and configure Access Groups, click Configure > Field Management > Access Group Maintenance.
The Access Groups you create and assign will control the information available for the user within the application. Access Groups can be unique to your organization. Possible examples of Access Groups could represent trades, departments, crews, or other criteria that separate data viewing for users. At least one Access Group is required and will be assigned in Configure > Field Management > User Maintenance.
To create a new Access Group, click OK when (new) is displayed in the Group Name field.


Selecting the Filtered option allows you to identify which records to Include or Exclude. Multiple entries of Include and Exclude criteria can be created within a single Filter by clicking on the Green + button.
Note: When using Exclude filters, you must create at least one Include filter. Start by setting up an Include filter then define an Exclude filter to omit specific records.
- Jobs: Specify Jobs a user can look up and select.
- Active: All Jobs with Active status.
- None: A user would be unable to look up and select Job items.
- Filtered: Include or Exclude items based on the following:
- Include Jobs:
- From Job and To Job Numbers: Single or range
- Matching: Jobs IDs that contain specific characters (e.g. 24**** for all job numbers that begin with 24, **WB**, etc.)
- Class: All or specific (from Create/Edit a Job)
- Status: All, Active, Inactive, Closed, Active + Inactive, Inactive + Closed
- Type: All, T&M, Non-T&M (jobs with phases and or categories)
- Include Phases:
- From Phase and To Phase ID: Single or range
- Matching: Phase IDs that contain specific characters
- Status: All, Open, Closed
- Include Categories:
- From Category and To Category ID: Single or range
- Matching: Category IDs that contain specific characters
- Status: All, Open, Closed
- Checkbox for Require Labor Budget
- Exclude Jobs:
- If selected, Exclude Phases and Exclude Categories are disabled.
- From Job and To Job Numbers: Single or range
- Matching: Jobs IDs that contain specific characters (e.g. 24**** for all job numbers that begin with 24, **WB**, etc.)
- Class: All or specific (from Create/Edit a Job)
- Status: All, Active, Inactive, Closed, Active + Inactive, Inactive + Closed
- Type: All, T&M, Non-T&M (jobs with phases and or categories)
- Exclude Phases:
- If selected, Exclude Categories is disabled.
- From Phase and To Phase ID: Single or range
- Matching: Phase IDs that contain specific characters
- Status: All, Open, Closed
- Exclude Categories:
- From Category and To Category ID: Single or range
- Matching: Category IDs that contain specific characters
- Status: All, Open, Closed
- Checkbox for Require Labor Budget
- Include Jobs:
- Employees: Specify Employees a user can look up and select.
- Active: All Employees with Active status.
- None: A user would be unable to look up and select any Employee.
- Filtered: Include or Exclude items based on the following:
- From Emp to To Emp ID
- From Location and To Location (Employee Maintenance)
- Status: Active, Inactive, All
- Equipment: Specify Equipment a user can look up and select.
- Active: All items with Active status, all billing classes, all value classes.
- None: A user would be unable to look up and select Equipment.
- Filtered: Include or Exclude items based on the following:
- From Equip and To Equip ID
- Fleet Codes Matching: Fleet Code ID's that contains specific characters
- Status: All, Active, and Inactive
- From Code to Code (Equipment Code Maintenance)
- Code Types: Revenue, Cost to Own, Cost to Operate
- Payroll Departments: Specify Payroll Departments a user can look up and select.
- All: Indicates the user can look up and select all Payroll Departments.
- None: A user would be unable to look up and select any Payroll Departments.
- Filtered: Include or Exclude items based on the following:
- From Code and to Code
- Worker Classes: Specify Workers Classes a user can look up and select.
- All: Indicates the user can create and view all Worker Classes.
- None: A user would be unable to look up and select any Worker Classes.
- Filtered: Include or Exclude items based on the following:
- Type: Non-Union, A Specific Union, All Unions, Non-Union + All Unions
- If a Specific Union is selected as a Type, the Union can be assigned
- From Class to Class
- Absence Codes: Specify Absence Codes a user can look up and select.
- All: Indicates the user can create and view all Absence Codes.
- None: A user would be unable to look up and select any Absence Codes.
- Filtered: Include or Exclude items based on the following:
- From Code and to Code
- Worker Locations: Specify Work Locations a user can look up and select.
- All: Indicates the user can create and view all Worker Locations.
- None: A user would be unable to look up and select any Worker Locations.
- Filtered: Include or Exclude Job, Shop, or Travel
- Expense Types: Specify Expense Types a user can look up and select.
- All: Indicates the user can create and view Expense types for all types.
- None: A user would be unable to look up and select any Expense types.
- Filtered: Include or Exclude items based on the following:
- Checkboxes for Equipment, Fuel, Lodging, Material, Meals, Mileage, Misc, and Transportation
- Field Logs: Specify the types of Fields Logs a user is able to create and view.
- All: Indicates the user can create and view Field Logs for all Field Log types.
- None: A user would be unable to look up and select any Field Log types.
- Filtered: Include or Exclude items based on the following:
- From Type and To Type
- "From Date" defaults to 90 days prior and controls the volume of historical Field Logs that will be sent to Field for viewing
- "Include Blank Type" checkbox for legacy users
- Inventory Items: Specify the Inventory Items a user can look up and select.
- Active: All items with Active status, all billing classes, all value classes.
- None: A user would be unable to look up and select Inventory Items.
- Filtered: Include or Exclude items based on the following:
- From Item and To Item ID
- From Class and To Class
- Status: All, Active, Inactive
- Billing Class: Checkbox options for Labor, Material, Services, and Other
- Value Class: Checkbox options for G/L, Non G/L, and Intangible
- Vendors: Specify the vendors a user can look up and select.
- Active: All Vendors with Active status.
- None: A user would be unable to look up and select Vendors.
- Filtered: Include or Exclude items based on the following:
- From Vendor and To Vendor ID
- Status: All, Active, Inactive
- Checkbox selection for Suppliers, Subcontractors, and Other
User Maintenance
A User must be created for an individual to access ComputerEase Field.
Note: To determine the capabilities for a user, each user must be assigned at least one Role (defines capabilities), along with at least one Access Group (identifies desired data available to the user).
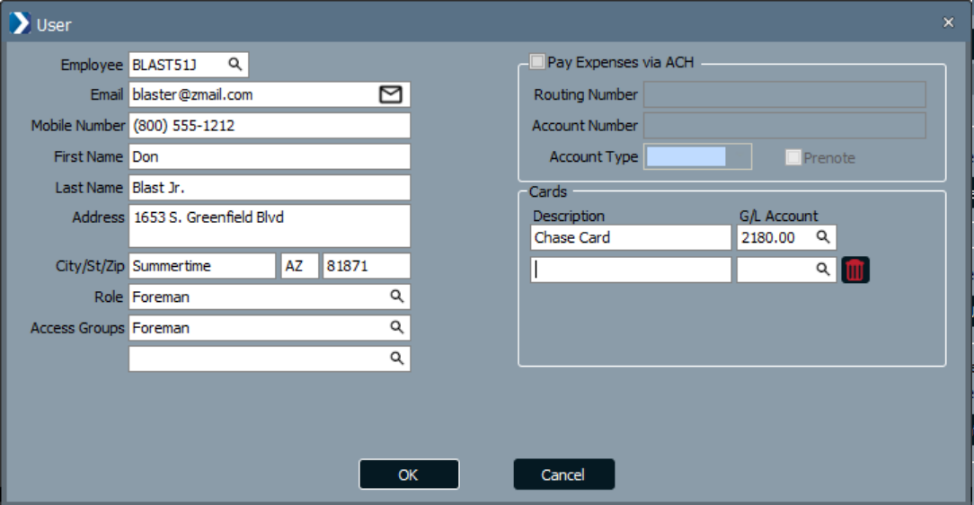
To create a User, go to Configure > Field Management > User Maintenance and enter details and configure access rights.
- New User: Click this button to create a new User and enter the following information:
- Employee: Assigning a ComputerEase Employee ID to a ComputerEase Field user links the user for payroll processing. As a result, time history from previous payrolls will automatically transfer for the Employee ID assigned. This allows the ComputerEase Field user to view time entries for 12 months of past processed payrolls such as hours and job distribution, and no rate information. After selecting an employee, you will be prompted with an option to auto-populate the Email, Mobile Number, and address from the Employee Maintenance record. Note: An Employee ID may be assigned to one User only. If you entered an incorrect employee ID, changing the employee ID removes the time history transferred prior and provides the User with the new employee time history.
- Email: Enter the email address in which invitation correspondence will be sent. This field is required.
- Mobile Number: Enter the mobile phone number for the user to use for login and receive SMS text verification codes. This is an optional field.
- Role: Select a role for the User. A single Role is required for each User. Note: Roles define what capabilities users can use (Time and or Expense) and their permissions within those areas.
- Access Groups: Select an Access Group for the User. At least one Access Group is required for a User; however multiple groups can be assigned. Note: Access Groups define which data ComputerEase Field users can access.
- Invite User: After you create a new User, you need to invite the User to use the application. To do this, highlight the user and select Invite User. Inviting a User changes the User Status to Not Verified. The User will be sent an email containing ComputerEase Field download instructions to the email address in User Maintenance. Once they have successfully logged in to ComputerEase Field the Status will change to Active in ComputerEase.
- Edit User: Click this button to revise details of existing Users.
- Disable User: Click this button to disable the User access to ComputerEase Field for this company. Disabling a User also frees up a seat for Time and or Expense as enabled in the user's assigned role.
Note: Available seats for both Time, Expense, and Project Management Users are verified when changes are made through Role Maintenance and User Maintenance:
- Changing an existing Role that is assigned to Users could result in exceeding available seats.
- Assigning a Role to a User could result in exceeding available seats.
- To confirm who is holding the seats in use, you can click View Time Users, View Expense Users, or View Project Mgmt Users to see a list of users that are enabled for each capability.
View Sync Status
To ensure that your API connection is active and syncing properly, click Configure > Field Management > View Sync Status. The last sync start and stop times, as well as a verification of record and error counts will be displayed. If you do not see View Sync Status on your Field Management menu, log in with your Password Maintenance and ensure Field Management > View Sync Status is selected.
If you do not see sync statistics in View Sync Status, Deltek recommends you stop and restart CE Live to initiate synchronization. View Sync Status will not populate until at least one Access Group is established.
Note: The initial sync at the time of activation may be delayed due to the high volume of information passing through the API. This initial delay could be as much as 15 minutes or more.
User Authentication
The method of authentication used to log into ComputerEase Field app is determined by the method selected by the user during initial login (refer to this link for instructions).
If the user has a fingerprint, face ID, or passcode set up on the device, the user can choose to activate device authentication when accessing the app. Deltek highly recommends users to use device authentication, so they do not have to re-authenticate every 24 hours.
ComputerEase Field Time
Configure Alerts for Tolerance Settings
Alerts are generated in ComputerEase Field for entries that exceed the tolerance specified. The tolerance is calculated from the difference of the geo arrival time or departure time entries, or both compared against the submitted time entries of a user.
Procedure: To configure an alert for tolerance settings:
- Click Configure > Field Management > Role Maintenance.
- In the Role Maintenance dialog box, click New Role or Edit Role.
- In the Time Entry Alerts over field, enter a whole number in minutes for ComputerEase Field users who are entering start and stop times.
- In the Hours Entry Alerts over field, enter a value in hours, up to 2 decimal places for ComputerEase Field users who are not entering start and stop times.
- Click OK.
Note: When you leave the Time Entry Alerts over field and Hours Entry Alerts over field blank, an alert is received for all entries. To avoid receiving unnecessary notifications, enter a value greater than 0.
Approval Team Maintenance
You can create an Approval Team and add users in the team as approvers of time entries from ComputerEase Field. Approval Teams are assigned to Jobs through Create/Edit a Job on the Payroll tab. When time is entered for a Job in ComputerEase Field, all members of the assigned Approval Team will receive a visual indicator in ComputerEase Field that there are entries awaiting their approval.
When a member of the Approval Team approves a Time Entry through ComputerEase Field, the time will automatically flow to the Time Center in ComputerEase, and the app status will change to "Approved". Approvers may also reject entries requiring an employee to edit and resign their entry.
Note: Field does not have multilevel approvals. Once a member of an Approval Team approves an entry, the approval is considered complete and does not flow to other members of the team.
To access Approval Team Maintenance, click Configure > Field Management to display the Approval Teams dialog box.
Create an Approval Team
Procedure: To create an approval team:
- In the Approval Teams dialog box, click New Team to display the Team dialog box.
- In the Name field, enter the name of the approval team and then, click OK.
- In the Users - Lookup dialog box, select the users you want to be part of the new approval team.
- Click Close.
Note: When you exit the Approval Teams dialog box or click Done with an approval team without a single member added to the team, a Warning dialog box is displayed.
Edit an Approval Team
Procedure: To edit an approval team:
- In the Approval Teams dialog box, select an approval team.
- Click Edit Team to display the Team dialog box.
- In the Team dialog box, edit the name of the team.
- Click OK.
Note: When you edit the name of the approval team, the updated name is also reflected on the Payroll tab of the Job Code dialog box (Job Costing System > Job Maintenance > Create/Edit a Job).
Edit Multiple Approval Teams using Create/Edit a Job
Procedure: To add and edit multiple approval teams for a job:
- Click Job Costing System > Job Maintenance > Create/Edit a Job.
- In the Create/Edit a Job dialog box, click File > Edit Approval Teams.
- In the Add Jobs dialog box, use the following fields as needed to add and filter multiple jobs:
- Customer
- Job Class
- Job Status
- From Job
- To Job
- Click OK.
- In the Edit Approval Teams dialog box, use the following buttons as needed to select multiple jobs for editing:
- Add Jobs: Provides filter options to call the jobs you wish to view, edit, or modif
- Select All: After jobs were called through Add Jobs, Select All selects the checkboxes for the jobs where your Approval Team changes will apply.
- Select None: Clears all checkboxes for selected jobs.
- Selection Approval Team: Selects the Approval Team to be applied to the selected jobs.
- Save: Saves changes to apply your changes. Note: Pending time entries are redirected to the appropriate Approval Team.
- Cancel
Delete an Approval Team
Procedure: To delete an approval team:
- In the Approval Teams dialog box, select an approval team.
- Click Delete Team to display the Verify Delete dialog box.
- Complete one of the following actions:
- In the Team field, perform a lookup and select a team to reassign the job approvals to.
- Select No Approval Team.
- Click Yes.
Add Members to an Approval Team
Procedure: To add members to an approval team:
- In the Approval Teams dialog box, select an approval team.
- Click Add Member(s).
- In the Users - Lookup dialog box, select the users you want to be part of the new approval team.
- Click Close.
Remove a Member from an Approval Team
Procedure: To remove a member from an approval team:
- In the Approval Teams dialog box, select a member of approval team.
- Click Remove Member.
Note: When you exit the Approval Teams dialog box or click Done with an approval team without a single member added to the team, a Warning dialog box is displayed.
ComputerEase Field Time Entry Flow to ComputerEase
The following is the typical flow of signed ComputerEase Field entries:
ComputerEase Field → Time Center → Labor Distribution
Time Center
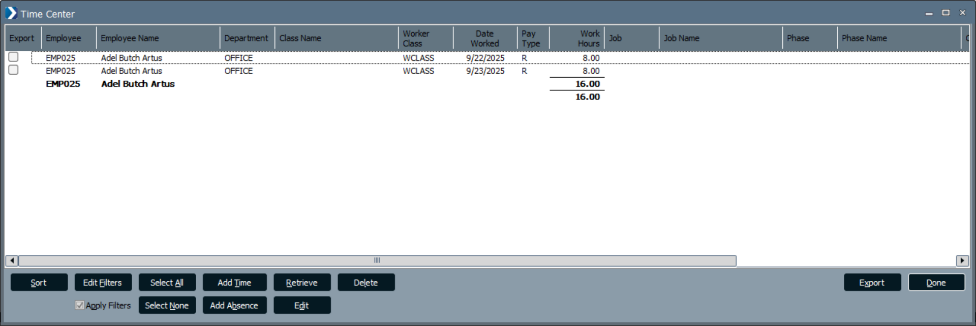
The Time Center serves as a centralized hub where ComputerEase Field time entries flow to be reviewed and edited before exporting them into Labor Distribution. When time entries from ComputerEase Field are signed by the employee, they will be available in ComputerEase, under Payroll System > Time Center.
The Time Center allows the ComputerEase user to review and edit signed ComputerEase Field entries for accuracy in a customized view before exporting time to Labor Distribution for payroll processing, or absences to Absence History.
The completion of ComputerEase activities will update the status and editing capabilities in ComputerEase Field.
- Pending: This status indicates that the entry is not yet signed and can be edited in ComputerEase Field. The entry is not yet visible in ComputerEase.
- Signed: This status indicates that the entry has been signed and is awaiting approval by a member of the Approval Team assigned to the job. If no Approval Team has been assigned to the Job, the status will move to Approved when signed). Signed entries can be edited if needed.
- Approved: This status indicates that the entry has been approved and is ready to be viewed in the Time Center.
- Retrieved: This status indicates that an entry has been viewed in ComputerEase through the Time Center. The Retrieved status occurs when signed entries have been viewed in the Time Center or unsigned entries have been manually retrieved into the Time Center. Retrieved entries cannot be edited in ComputerEase Field.
- Processing: This status indicates that the ComputerEase Field entry has been exported to Labor Distribution. The entry is not editable in ComputerEase Field or the Time Center.
- Processed: This status indicates that the Payroll processing is complete. The entry is not editable in ComputerEase Field and is no longer available in Time Center or Labor Distribution.
- Voided: This status indicates that the Payroll check was voided. The original entry will display as zeros in ComputerEase Field.
Customizing the Time Center
The Time Center view can be customized and retained by a ComputerEase user.
- Selecting Columns to Display
- Drag and drop column headings to reorder columns.
- Right-click in the header row to view available fields and select/de-select columns to display.
- Created by and Approved are optional fields for display.
- Sorting and Subtotaling
- Clicking a column heading creates an ascending sort. A second click changes the sort to descending.
- The Sort button allows additional sort criteria to be defined, the order of sorting to be performed, and the ability to turn subtotals on/off.
- Filtering Entries
- Clicking Edit Filters allows you to select the specific entries you would like to view:
- Date Worked
- Employee
- Job
- Phase
- Category
- Pay Period
- Include labor distribution: When this is selected, entries that reside in labor distribution from a Time Center Export or entered through Labor Distribution functions can be viewed. This can be especially helpful if you are attempting to verify hours for an entire week, and so on.
- Include absence entries: When this is selected, absence entries that were added in Time Center or imported from ComputerEase Field but are not yet exported can be viewed.
- Apply Filters allows you to quickly turn on/off record Filters.
- Clicking Edit Filters allows you to select the specific entries you would like to view:
- Editing Entries: Double-click an entry to edit it or highlight the entry and click Edit.
- Adding Entries
- Time, Nontax, and Other entries may be manually added in Time Center by clicking Add Time.
- Absence entries may be manually added in Time Center by clicking Add Absence.
- Deleting Entries: Highlighting a record and clicking Delete will allow you to remove a record. Note: Edits, additions, and deletions that occur in Time Center or Labor Distribution will be written back to ComputerEase Field when the payroll process is completed. The original submitted ComputerEase Field information will be maintained for future reporting. Deleted entries will display as 0 (zero) hours in ComputerEase Field.
- Retrieving Entries: The Retrieve button allows you to manually pull entries from the Field application that have not yet been signed. Leaving the Employee field blank selects all employees or you can select a single employee for retrieval. When you are retrieving time for all employees or a single employee, the first Date Worked is optional. However, To Date Worked is required.
- Saving Entries for Future Export: Clicking Done saves any changes and the Export status of the entries displayed so Export can be done at a later time.
Labor Distribution
ComputerEase Field entries flow from the app into the Time Center and require export into Labor Distribution for payment processing. If Time Center entries need revision after export into Labor Distribution, they may be edited or deleted as needed. Changes will flow back to ComputerEase Field when payroll processing is finalized.
Export Entries to Labor Distribution
Procedure: To export entries from the Time Center to Labor Distribution:
- Select entries to export by completing one of the following actions:
- To select an individual record, select the checkbox under the Export column.
- To select a range of records, hold down the SHIFT key and click the desired records. And then, select the checkbox under the Export column.
- To select all records visible in the Time Center, click Select All. To clear the Export checkbox for all records, click Select None.
- Click Export to push the selected Time Center entries to Labor Distribution. A prompt for selection of the "Payroll" desired will display and is required. When Time Center entries have been successfully exported, the Export checkbox becomes disabled. The option to display or hide exported entries is available in Edit Filters.
- When exported, absence entries will flow to the "Employee Absences" module for inclusion in the Absence Manager and Absence Reporting.
Note: Entries will remain available for viewing in the Time Center until the payroll process has been completed for exported entries. As with Labor Distribution, when the payroll is posted, the exported entries will no longer display. Absences will be removed from the Time Center once exported.
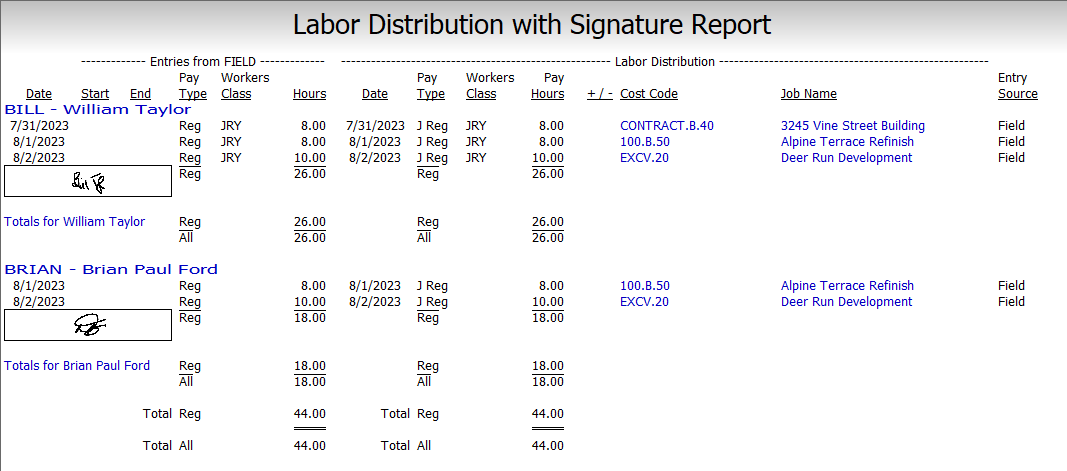
Labor Distribution with Signature Report
Comparing the entries as they originated in ComputerEase Field against the Labor Distribution revisions is easily performed by generating the Payroll System > Labor Distribution Report > by Employee with Signature. This report provides images of employee signatures along with a calculated difference between hours submitted and hours pending payment. Including the Job Name on the report is an optional prompt. The Entry Source column identifies the origination of an entry:
- Field: The entry originated in ComputerEase Field.
- Manual: The entry originated from a manual entry in Labor Distribution.
- Automatic: This was a system-calculated adjustment (automatic overtime).
- FieldEase: The entry was imported from FieldEase.
- 3rd Party: The entry was imported from a file.
This report is a temporary report, and information will be cleared when Payroll is posted (as do other Labor Distribution Reports). Deltek recommends saving as a PDF. The Creator and Approver of ComputerEase Field entries will also be displayed on the report.
ComputerEase Field Expense
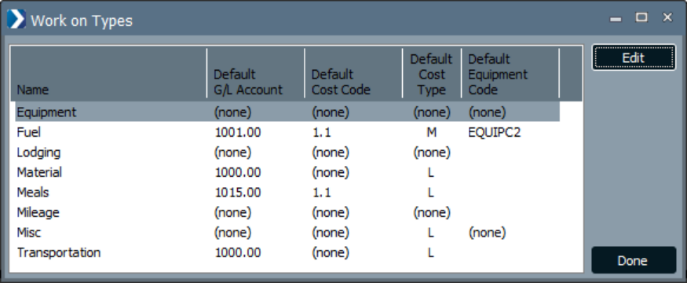
After you have created Users, Roles, and Access Groups, proceed to Accounts Payable > Expense Management > Work on Types.
Expense Types are predefined categories that have the option for default G/L Accounts, cost codes, and job cost type, Equipment, and Equipment Cost Type. While not required, using defaults can ensure accuracy and streamline the editing process for classifying Expense entries from ComputerEase Field.
When ComputerEase Field Expense entries are created, the user must either choose Personal Expense or select a company Card based on the options defined in User Maintenance.
Edit Type Information
Procedure: To edit type information:
- In the Work on Types dialog box, select a type and click Edit.
- In the Type Information dialog box, use the following items as needed:
- Default Account Note: Beside Default Account is the Allow J/C Dept Override checkbox. When you create an expense using the expense type with the Allow J/C Dept Override checkbox selected, the Account field in the Expense dialog box (Accounts Payable > Expense Management > Work on Reimbursable Expense or Work on Non-Reimbursable Expenses) is automatically filled with the general ledger account information.
- Default Phase
- Default Category
- Default Cost Type
- Default Equipment Code
- Click OK.
Work on Reimbursable Expenses

If an expense was submitted as a Personal Expense through ComputerEase Field, the entry will flow into Accounts Payable > Expense Management > Work on Reimbursable Expenses. Selecting the dials in the header will display entries by status:
- Open: This status shows pending entries awaiting approval, rejection, and payment. Double clicking on the transaction will allow you to edit the distribution of the expense and view the receipt image. Approvals may be performed from the summary or detail window so they may be paid. Rejections may also be performed from the summary or detail windows. after an Open entry has been Approved or Rejected, it will show in the appropriate window.
- Approved: This status shows Approved Entries which are ready to be paid.
- Rejected: This status shows Rejected Entries in Expense and in ComputerEase Field Expense. Rejected entries will need to be resubmitted through ComputerEase Field Expense.
Approving, rejecting, and paying can be performed in the Summary window by selecting one or more entries and clicking the appropriate button, or individually within the detail view of the entry. When selecting the option to pay, you will be prompted with a payment window to pay either by check or if applicable by ACH. Expenses paid by ACH are finalized through Accounts Payable > Process ACH Payments.
Work on Non-Reimbursable Expenses

If an expense was submitted as a Card, the entry will flow into Accounts Payable > Expense Management > Work on Non-Reimbursable Expenses. Selecting the dials in the header will display entries by status:
- Open: This status shows pending entries awaiting approval or rejection. Double clicking on the transaction enables you to edit the distribution of the expense and view the receipt image. Approvals may be performed in the summary or detail window. Rejections may also be performed in the summary or detail window. After an open entry is approved or rejected, they will show on the appropriate window.
- Approved: This status shows Approved Entries ready to be posted. After an Expense entry has been Approved, do not forget to post the transactions by selecting them and clicking Post. Posting sends the expense to Job Cost and the General Ledger.
- Rejected: This status shows Rejected Entries. Rejected Expenses need to be recreated and resubmitted through ComputerEase Field Expense.
Approving or rejecting can be performed on the Summary window by selecting on or more entries and clicking the appropriate button, or individually on the detail view of the entry.
Create Expense for Work on Reimbursable and Non-Reimbursable Expenses
In the Work on Reimbursable Expenses dialog box or Work on Non-Reimbursable Expenses dialog box (Accounts Payable > Expense Management > Work on Reimbursable Expenses or Work on Non-Reimbursable Expenses), you can add expenses directly into ComputerEase using Create Expense.
You can click Create Expense to display the Expense dialog box where you can do the following:
- Specify expense information such as user, merchant, cost code, and equipment information
- Add PDF and JPG files such as receipts
- Approve or pay the created expense
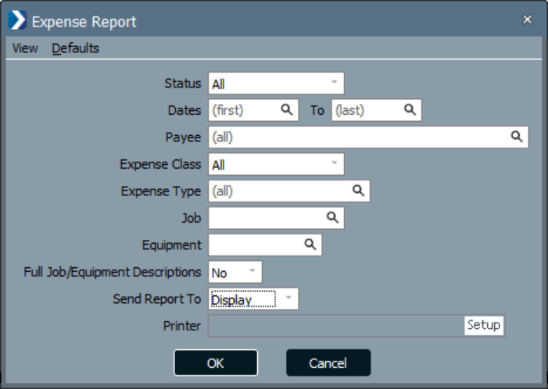
Expense Report
Reviewing pending and processed expenses can be performed by generating the Expense Report. There are many filters that allow you to customize the data you view.
Project Management
Field Logs
Field Log Type Maintenance
You can configure the desired information for Fields Logs for use in ComputerEase Field.
Configure Field Log Sections and Fields
Depending on the field log information you want your users to record, you can enable and disable sections for information in a field log using ComputerEase for ComputerEase Field. You can have many different Field Log Types (e.g. Daily Production Logs, Injury Reports, Equipment Checklists, Safety Training Logs, etc.). You can define the information you want to collect, and the order you would like the information to be collected/presented. You will need at least one Field Log Type defined.
- Click Document Management > Field Logs> Maintenance Programs > Field Log Type Maintenance. In the Field Log Type Maintenance dialog box, specify a code for your Field Log Type field and click OK. (SAFETY, DAILY, etc.), then enter a Description to identify what the log represents.
- Optional: In the Automation Defaults section, do one or more of the following:
- Select the Auto Equipment Import checkbox to enable automatic import of equipment information in the Equipment section of a new Field Log. If this checkbox is not checked, the users in ComputerEase Field can still pull in Equipment usage entries by clicking the Refresh button in the section, but it will not come in automatically.
- Select the Auto Time Import checkbox to enable automatic import of time information in the Employee section of a new Field Log. If this checkbox is not checked, the users in ComputerEase Field can still pull in Employee Time entries by clicking the Refresh button in the section, but it will not come in automatically.
- Select an option in the Production Update Default field to assign a default status for Production submissions which will appear in the Field Log Production Updates window.
- Optional: In the Enable and Order Sections section, select one or more of the following sections you want included on the Field Log. You may drag and drop the sections to define the entry and reporting section order.
- Weather
- Employees
- Subcontractors
- Material
- Equipment
- Visitors
- Productivity
- Signatures (Web)
- Notes
- Additional Information
- Attachments
- Optional: In the Additional Information (User Defined Fields) section, select a user defined field (UDF) and click Assign Section to assign a section to the UDF. This allows you to specify the section you would like the field to appear, or [Not Used] if the field is not applicable to the Field Log Type. You may drag and drop the fields to define the entry and reporting order of the fields.
- Click OK to save the Field Log Type.
User Permissions for Downloading New Field Logs into the Desktop
New Field Logs will flow into Document Management > Field Logs > Field Log Management Center. You may want to allow project managers to view Field Logs which have already been reviewed but disallow the ability to collect new unedited/reviewed Field Logs.
Procedure: To enable/disable downloads of field logs in the Desktop:
- Log in to ComputerEase Field as PW MAINT user.
- In the Password Maintenance dialog box, select a user, and then, click Edit User.
- In Programs > Project Management > Document Management, select the New Field Log Download and Notifications checkbox.
- Click OK.
Field Log Management Center
The Field Log program is designed to improve automation and reduce clicks not only in the field but at the Desktop. If user permissions allow, newly submitted Field Logs from Field will automatically populate the Desktop through the Management Center (no import step needed). The Management Center has also received the following enhancements:
- Newly submitted Field Logs from Field and new FieldEase imports will appear in bold indicating they are ready for Desktop Edit/Review. Once opened, the bold will be removed.
- Management Center allows Field Log filtering by User or Source to more easily view select entries by person, or by entry source.
- "Created By" [User Name] column, which displays either the Desktop ComputerEase User Name, or Field User Name.
- Source" [Entry method] column which displays the entry source of Field, FieldEase, or Desktop.
- For FieldEase Field Logs, the Batch column removed as the batch is now combined with the Source.
Desktop Edits of Field Logs
The password maintenance permissions for Editing a Field log in the Desktop are respected in the Management Center. We have enforced the following Edit and Delete rules:
- Once Field has submitted a Field log, the Field user is no longer able to edit it.
- Changes made to Field Logs at the Desktop will update the Field Log when viewed in Field, with the exception of attachments added at the Desktop.
- Desktop deletion of an entire Field Log created by Field is disallowed.
- Individual submitted Field Log records generated through Field may be edited at the Desktop, but not deleted.
Management Center Download Permissions
System Administrators can limit a user's ability to download newly submitted Field Logs into the Management Center through Password Maintenance (Project Management > Document Management > New Field Log Download and Notifications).
Field Log Production Updates Window
You can post production data to job costs using the Field Log Production Updates window. This feature provides similar functionality to Job Cost System > Job Maintenance > Enter Units Complete. However, the entries can be collected through ComputerEase Field > Field Logs.
To open the Field Log Production Updates window, go to Document Management > Field Logs > Field Log Production Updates. Access to this function is enabled through Password Maintenance by selecting Programs > Project Management > Document Management > Field Log Production Updates.
The Field Log Production Updates window allows you to review ComputerEase Field and Desktop Field Log production entries (New Units Completed, Cost to Finish, or Percent Complete). You can also select the Update behavior for a Field Log production entry:
- Update Job Production: Indicates you want this entry to update Job Cost.
- No Job Update: Indicates you do not want this entry to update Job Cost.
- Hold for Review: Indicates you are unsure of update status and want to maintain a "pending" status for future review.
Selecting records for Production status assignment:
- Select a single record and assign your desired update status.
- Select multiple records by holding down the SHIFT key while clicking records, then click the Assign Selection Status button and assign desired update status.
- Click the Select All button, then click the Assign Selection Status button and assign desired update status.
- Deselect All clears record selections.
When you have completed your Production Update assignments:
- Save: Does not perform any updates but closes the Field Log Production Updates screen, retaining record status for future editing and processing.
- Save and Update: The system will check for conflicting entries (e.g., multiple % completes for a task on the same day, phase, and category), and indicate conflicting entries with a red exclamation mark. You must change the status for the entries you wish to remove from update before proceeding.
Once conflict resolution is complete:
- Update Job Production records will post to Job Cost, lock the Production Entry from editing, and remove from future Production Update sessions.
- Hold for Review records will retain and display in future Field Log Production Update sessions.
- No Job Update records will be removed from future Production Update sessions.